Item Master Data: Creating New Item Codes - Service & PDI
Before you raise any new item codes, first check to see if the item might already exist on SAP. Please see the following Guru card for more information: Item Master Data: Search for existing part nrs on SAP
Item Master Data Screen:
For each item, you enter the data relevant for a particular area in SAP Business One, which uses this data for purchasing, sales, production, warehouse management, accounting, and services.
You use the Item Master Data window to add, update, search, and maintain item data. This window lists all the items in your company.
To access the window, choose Inventory (or Stock Management depending on your settings) - Item Master Data.
You can choose Go to in the menu bar to access the following options in SAP Business One:
New Activity
Alternative Items
Business Partner Catalog Numbers
Bill of Materials
Related Activities
Inventory Posting List
Items List
Serial Numbers Transactions Report
Batch Numbers Transactions Report
Inventory Status
Available-to-Promise
General Area Tab:
Use the General area to enter, search, and maintain general information relevant for all item types
The "new item" code allocation for the different cost centers are as follows:
Service Centre:
Consumables: 170001 - 179999
Raw Materials (Stock Items): 600000 - 689999
PDI Centre:
Consumables: 190001 - 199999
Raw Materials (Stock Items): 690000 - 699999
By using these codes set out for your cost centre, it would eventually make it easier for everyone to identify which items belongs (or was originally set up) to a certain warehouse
Please see guru card Definition of Consumables for definition of consumables.
Please note - the above code allocation is for new items only that does not already exist on SAP. Please use the existing item codes for an item on SAP where applicable.
Adding a New Master Record:
Choose Inventory Item Master Data.
The Item Master Data window opens in Find mode. Switch to Add mode. (Ctrl A)Specify the required information on each of the following tabs:
General Area - Enter the item information: its number, description, type, group, and price list.
General - Provide additional general information about the item.
Purchasing Data - Specify purchasing-related information, such as regular vendor details, purchasing unit, unit of measurement, customs group, and measurement details.
Sales Data - Specify sales-related information, such as sales measurement unit, packaging unit sales, and measurement details.
Inventory Data - Set the G/L accounts, define the costing method, specify the minimum, maximum, and required inventory level, and enter the warehouse details.
Planning Data - Enter the MRP and production-related information.
Properties - Select the relevant properties for the item.
Remarks - Provide any additional information about the item, including a picture attachment.
Choose Add.
A: General Area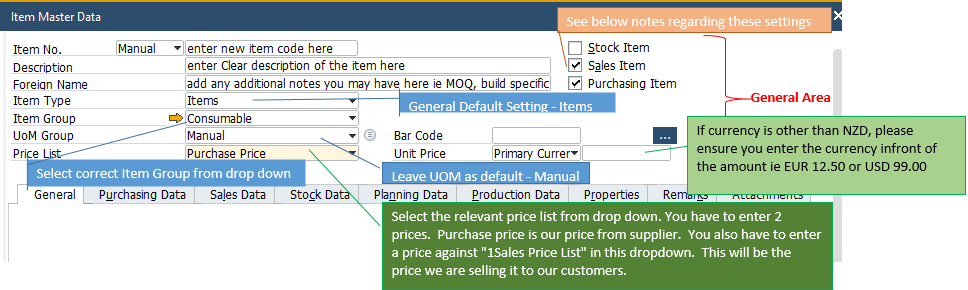
What does each of these tick boxes mean and how does it affect your stock and item audit:
Selection for Consumables: Selection for Raw Material:
Stock Item - only select this box if the item you are creating is an item that will be a raw material that you would want to be able to track sales and purchase history on. Typically this box is ticked for all Raw Materials on BOMs (not Consumables). If this box is not ticked, the item can not be added to BOMs and you would not be able to run a Stock Audit Report on it. Also, if the box is unticked, there will be no stock showing in your warehouse of this item as it would be deemed as a Consumable, which we don't do stock counting or tracking of.
Sales Item - always have this box ticked. This will allow you to be able to sell an item to customers through SAP.
Purchasing Item - always have this box ticked in order to use the item code when raising Purchase Orders
Please Note: Make sure you do the right selection of these tick boxes first time around because once you have done any transactions against an item code, you can't select or deselect the the Stock Item box.
B: General Tab
Please see the below Guru Card for more info on Items track by serial numbers.
Item Master Data - Items tracked by Serial Numbers
C: Purchasing Data Tab
See notes shown on above screenshot. The other areas on this Tab is not necessary to be completed for our application.
In addition to the Mfr Catalogue No. you have added on the above screen, you have to add this number to another screen so that it will appear on Purchase Orders to make it easily identifiable for the suppliers.
To be able to access the next screen where you must add the supplier's reference nr so that it will show on PO's, you have to first "ADD" the new item code to SAP. So, once you have come this far, take note of the new item code that you have created and click the "ADD" button at the bottom left of your screen. The new item will be created and the screen will go blank.
Go to Find mode (Ctrl F) > enter the new item code you just created > go to the Purchasing Data > right click on your screen and select "Business Partner Catalogue Numbers" as shown on below screenshot.
The following pop-up will appear. Here you enter the supplier name and their item reference numbers. If you have multiple suppliers for the same item, you can enter various suppliers and their unique item reference numbers here. Once done, click OK and you will go back to the main Item Master Data setup screen.
D: SALES DATA TAB
You can skip this tab. We don't really use this tab at this stage.
E: Stock Data tab
This tab is mainly important for stocked raw material items. Since Consumables is a non-stocked item, we don't need to add any settings to this page as you can't manage items that was set as non-stocked items ie Consumables. However, for items set as Stocked, you have to complete the following details:
Min. Inventory, Max Inventory, and Required Inventory
Enter values for the minimum, maximum, and required inventory levels for each warehouse, if necessary. These three columns only appear when you select the Manage Inventory by Warehouse checkbox.
If your inventory level in a certain warehouse falls below the Required (Purchase UoM) quantity you defined, then in a purchase document, the application suggests a minimum quantity to fulfill the inventory level required.
If your inventory level in a certain warehouse falls below the Minimum quantity you defined, the application may block your sales transactions or issue an alert, according to your definition for Response to Release/Receipt of Inventory Outside Defined Range in the Document Settings window.
If your inventory level in a certain warehouse exceeds the Maximum quantity you defined, the application may block your purchase transactions or issue an alert, according to your definition for Response to Release/Receipt of Inventory Outside Defined Range in the Document Settings window.
F: Planning Data Tab
This tab also only applies if it is set up as a Stocked Item ie Raw Materials
G: Production Data Tab
H: Properties Tab
I: Remarks Tab
J: Attachments
On this screen, you can add any relevant emails or files that involves the item. Examples: design/spec changes, a picture of the item, quotes, temporary alternatives etc etc. Whatever you feel is relevant and would be helpful to you or someone else in the future, attach it to the Item Master Data for this item.
To add an email, you can usually just drag the email from your Outlook Inbox into the Attachment folder. If this does not work, simply save the email to your desktop, click on the "Browse" button on right hand side of the screen and select the document you would like to upload to the item code. Same goes for any other spec files etc that you would like to attach that it saved in a folder on your computer.
To view the contents of the saved files on an existing item, highlight the line you want to view and click on the "Display" button.
In the "Free Text" column, you can add any additional notes about the file saved next to it.
If you want to remove a file, simply highlight the line and click the "Delete" button.
Note: If you have made changes on any of the above mentioned tabs, remember to click on the "Update" button at the bottom left of your screen before you exit the screen.