Absence Entry & Substitute Teacher / Casual Booking
Step 1) Log into Employee Self Service

Go to www.ecsrd.ca look for the Quicklinks and pick Employee Self Service
Or in Teams, navigate to ECS>General>Links and Favorite the link found there.
Step 2) Locate the Absence Menu and select Absence Entry and Enter Absence
At the top left, click My Info >> Time & Attendance >> Enter Absence
Complete the Absence Information Screen
- Enter the reason you are away (please choose the appropriate absence code – choosing the wrong code will result in your absence being denied)
- Select single day or range of dates.
- Choose the date you are away
- Click next
Complete the Absence Details Screen
For Teachers
For Support Staff
PLEASE NOTE: Absences automatically default to a full day. Teachers may select AM/PM buttons for morning or afternoon only absences. Support staff may enter specific start and end times using the 24-hour clock in the space provided. Do not “Add Schedule” unless you are working outside of your regular schedule (i.e. Saturday).
Step 3) Complete the Replacement Details Screen
- You will be prompted to identify if you require a replacement to cover your absence. The system will always default to YES. If you do not require a replacement, please indicate NO. If you are unsure, please indicate NO and follow up with your supervisor.
- If you do not require a replacement, the remaining two questions will be greyed out and not accessible.
- If you do require a replacement, indicating Yes, you will have the opportunity to indicate:
- Are they required to work the same schedule as you?
- Do you want to request employee(s) to replace you?
- Requested employees will receive an email and/or text if they have completed their email and text profile.
- ONLY requested employees will be notified otherwise the booking will be on the workboard for anyone matching the requirements.
- These fields will default to YES. Please indicate NO as required.
When Replacement is Required
- If you indicate your replacement is required to work a different schedule than you, the Replacement Schedule Details screen will display where you can indicate the appropriate replacement schedule requirements.
- Once you are satisfied with your selection, click the next.
- If you indicated you would like to request employee(s) to replace you, the Replacement Request screen will display where you can select up to five requested employees.
- Using the magnifying glass, lookup the employee you wish to be added to the Requested Employee list.
- Enter a portion of the name you want to search for in the search field. The replacement employee name will then be available on the dropdown. Please pick the name of your requested employee and click accept.
- Please note, if you have already made arrangements with a sub, please ADD them in the # 1 spot, and do not add anymore.
- If you have not already pre-arranged your sub, you can request additional subs for # 2 through # 5.
- The system will check your selected sub’s availability and will advise you if they are unavailable.
- NOTE: Requested Subs will all receive email/text notification at the same time. The job will be on the Workboard in a first-come, first-serve basis.
- If you indicated one requested replacement, you will be prompted to identify if you have already contacted the individual to fill your absence. If you have indicated more than one requested employee during your absence entry, you will not see the following prompt:
- If you have pre-arranged this sub to replace you, and they have agreed to fill your absence, indicate Yes. This will automatically dispatch this replacement employee and no notification or Workboard job will occur. If you have not specifically made arrangements with this sub to fill your absence, you must indicate No. The dispatch for your absence will be handled via Workboard to fill your absence.
- On the Replacement Instructions screen you may also see an attachment icon. Clicking on this icon will allow you upload document(s) for your replacement to view.
- TEACHERS will have an option to select subjects and level.
- Click on the drop-down arrows to select up to five subject areas (classified will have two) and corresponding levels (as applicable) for which your replacement will be required to teach or will have an area of responsibility for.
- Provide a specific message you would like communicated to your replacement employee. This message will be available on the Workboard.
- Once you are satisfied with your selection, click next.
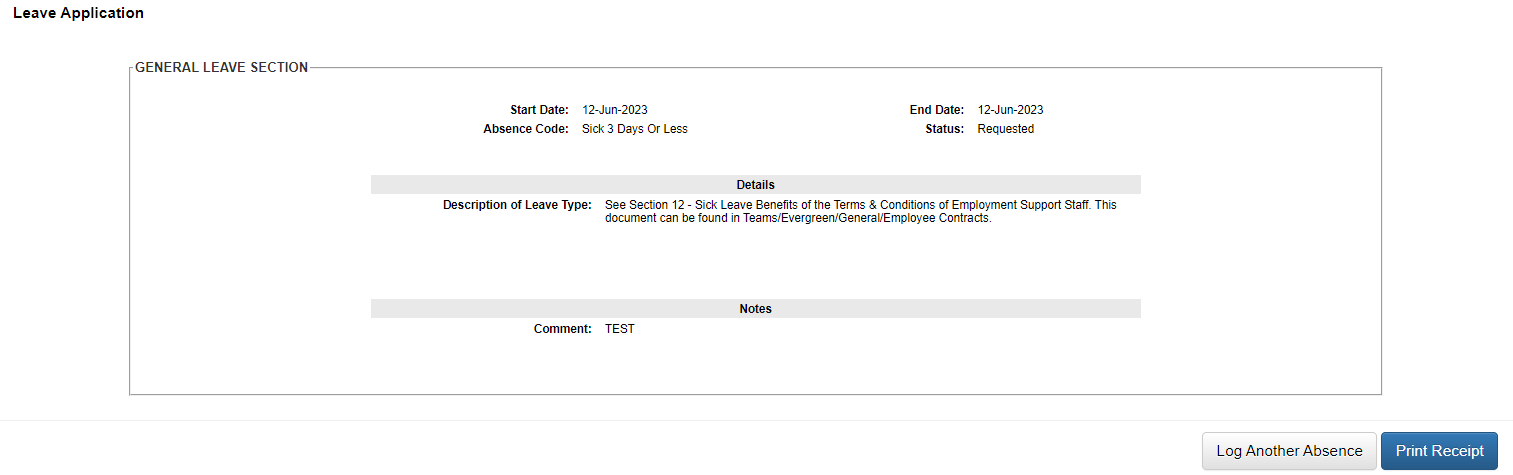
Step 4) Leave Application Entry
- This screen may appear differently for different types of absence reasons. Complete the details on this screen as indicated. If a field has been flagged as required, you will not be able to move to another screen until that field has been completed.
- This is where you can enter a comment regarding your absence (i.e. – sick with flu, dr. appointment, etc.)
- Click Next
Summary Page
- This page will summarize all of the selections you have made during your absence entry process. If you need to make a change, click on the back button of your browser to move to a previous screen.
- When you are ready, click the Submit Absence button.
Confirmation Page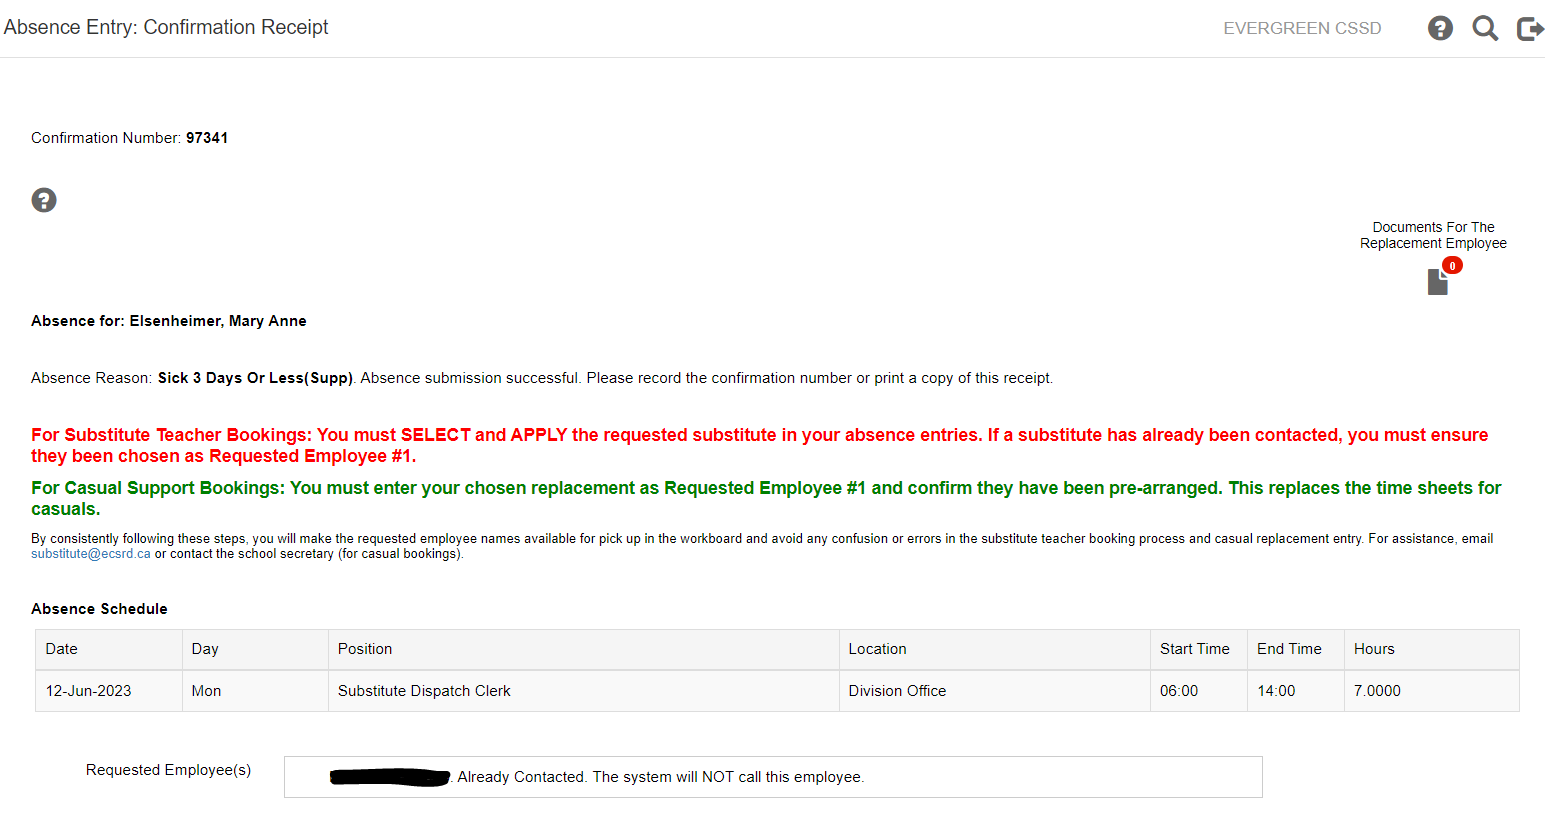
For additional dates, please log another absence.