Payroll Processing: Importing from QSRSoft

Objectives:
Learn how to import payroll data for employees using a QSRSoft integration. QSRSoft is a key part of business operations for many restaurants, and AllPay integrates with the system so that it’s easier to manage payroll.
What's in this article?
Instructions for how to import payroll data from QSRSoft. This primarily focuses on importing from QSRSoft for a single company, and touches briefly on some differences for multiple companies.
💡 Good to know: There are many ways to import payroll information into AllPay. Your AllPay should already be set up to import from QSRSoft if that is your company's method for inputting payroll data, but if it isn't, then please get in touch with your Customer Service Representative to make sure your system is set up for importing from QSRSoft.Please visit this article to learn more about other steps of the payroll process, including how to manually input data.
If you have any questions about MyQ, then reach out to your contact at QSRSoft or email qsrsoftsupport@qsrsoft.com.
AllianceHCM tips: Keep an eye out for tips from our experts!
Importing payroll data from QSRSoft
Log into MyQSRSoft: https://home.myqsrsoft.com/
Select the client in MyQ, and then use the left navigation to go to open the Workforce section. Then open the Payroll section, and then open Payroll Files.
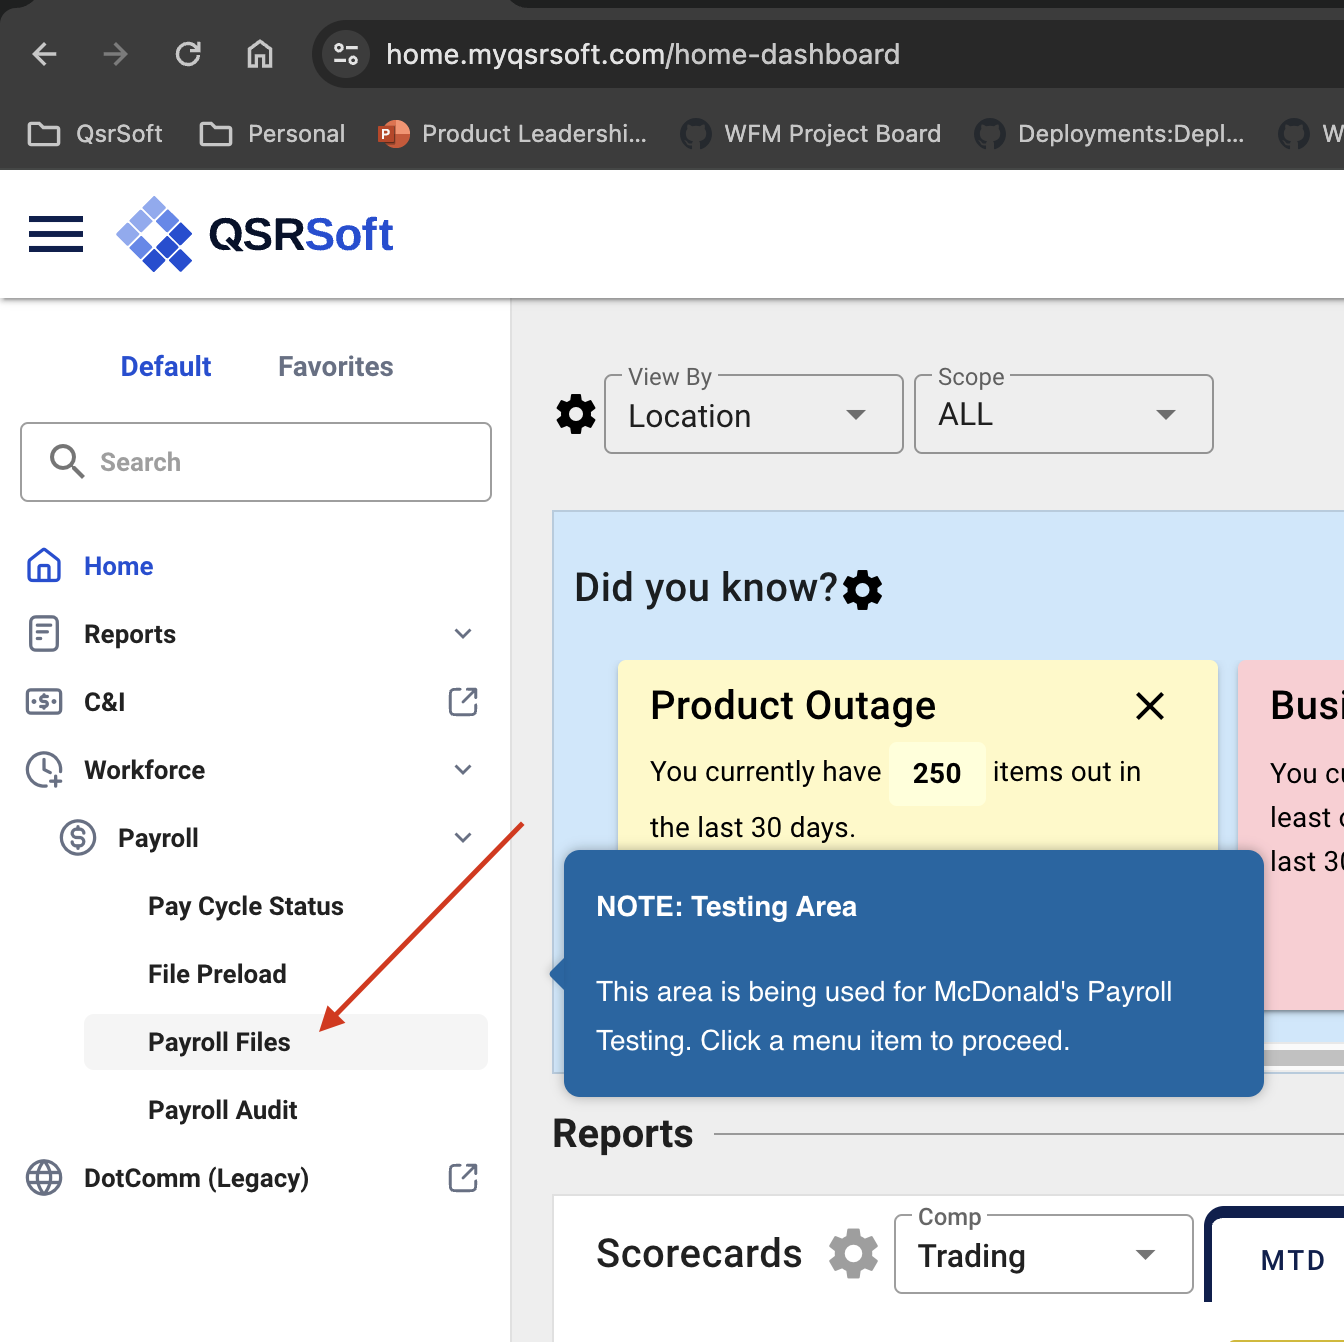
In the main part of the screen, you'll see Payroll Files. To download the payroll information, click on the File Name. This downloads a .zip file, which contains the payroll data and is what you’ll need to upload into AllPay. Be sure to save it in a place where you can easily find it in a few minutes.
AllianceHCM tip: Be sure to download the .zip file with the correct date. Additionally, do not download and save the .zip file multiple times in a way that the naming convention is changed to include an extra version number, such as (1) or (2) or similar, after the name. The file will not upload correctly into AllPay if it contains an extra version number and will give you an error.


Now let's go over to AllPay. If you haven't already, go ahead and log in. Then choose Payroll Control from the Payroll module.

We’re going to be looking at a check that is already scheduled. If you need to know how to change a check date or add a check date, refer to the article for Payroll Processing Step 1: Starting payroll and adding batches.

Scroll down until you can click on Save & Verify Options.

Then click on Start Payroll Now.

Now you’ve advanced in Payroll Control to Step 2 - Entry, and you’re ready to import your QSRSoft file.

Click on the tab for QSRSoft Interface from the blue navigation along the top.
You’ll see the QSRSoft Client Number on your screen, which should correlate to the client number in MyQ. This is for our fictitious client number 1234.

Let's get that file imported. Click on Choose File and then choose the .zip file that you downloaded from QSRSoft earlier and click Open in the pop-up window. Then click on Submit in AllPay.
You'll get a success notification when your .zip file has uploaded correctly, and then you're ready to move on.

Scroll a bit further down and you'll see an option for Step 2, Preview. Click on the Preview button.

Now you'll move down to Step 3, Interface. This is what actually brings in all of the information from your QSRSoft payroll file and correctly integrates it with your information in AllPay. Click on the Interface button to get the data integration going.
AllianceHCM tip: One important note is that what data imports will depend on your company’s setup in QSRSoft and AllPay. For example, some clients handle rate changes, new hires, and terms through platforms like eRestaurant and then import the changes into AllPay, where all the data will get updated after an import. Some companies may do the updates manually in both eRestaurant and AllPay as a system of checks and balances.

See that blue link for QSR Interface Report? That will download a breakdown of everything that has changed. Click on that and take a look at the QSRSoft interface report.
The QSR interface report will give you a breakdown of everything that is being changed with the import. This example has different stores and gives a payroll person the chance to check the total number of hours for each location. It’s important to use this report to see changes made by the import and check what’s in AllPay versus what’s in your source data.

This example of a QSR interface report has multiple companies included, which you can see in the bottom half of the report. Each company in this report has data that you can also check against your source data.

Back in the report for a single company, you can see that the report also shows new hires. Further down in the report you can also see rate changes, errors, duplicate employees–which may be due to employees working at multiple locations within a single pay period–and any interface warnings. This report is a valuable chance to review and ensure everything has been imported correctly and all necessary changes have been made.

Once you’ve checked the report and confirmed that everything looks good, go back to AllPay and move on to Step 4, Proceed to Time Import, and click on Time Import.

This takes you to the Time Import tab in AllPay, where you'll have to click on Import again in the column for Action to bring in all the data and put it into the batch for payroll.

Once the import has run, you’ll get a summary of interface warnings and imported items, too–you can see here that there are 0 interface problems and 536 imported items.

Now that we have that information added to the batch, we can click back to the tab for Payroll Control and see the three batches ready for payroll: A QSR batch, a semi-monthly batch, and a voids/manuals batch.
AllianceHCM tip: Batch names will vary depending on a company’s setup, so there may not always be a voids/manuals batch.

There's one more check to do to ensure things are going the way you hope. Click over to the Employee Pay Entry tab, where you can do some spot checks to ensure that a few employees have different hours than they did for previous payrolls.
In this case, if a store didn’t close out correctly, it will bring over the same hours as the previous payroll. We can use the pay history data to ensure a few employees are getting paid for the right number of hours for this pay period. This employee has 58.05 hours for this pay period. We’ll make a quick note of that and then verify their pay history.

To verify the pay history, we’ll go to the Employees menu at the very top of AllPay’s menu, and choose Pay History. Within the Pay History tab, we’ll look up this employee. We can see in the previous pay period they had 58.75 hours. That’s exactly what we want: That means our data for this payroll is from the new, different file that we uploaded.
AllianceHCM tip: We recommend doing this spot test for a few employees per location to ensure all data has imported the way you expect.

Once you’re done with your imports, you can make any changes that are necessary and move on with your payroll process. With all your data done and ready, you can use the Batch Totals tab to check your data.
AllianceHCM tip: Using batch totals isn’t required, but it is a best practice that we recommend to all of our clients to ensure accurate data and more easily pinpoint where there may be discrepancies between your source of data and the data in AllPay.
For a refresher on how to use batch totals, please reference our guide for Payroll Processing Step 3: Using batch totals to check payroll information. After using the batch totals, you can run a pre-process register (see our guide for Payroll Processing Step 4: Running the pre-process register) and then you can close your payroll batch and submit payroll (see our guide for Payroll Processing Step 5: Closing a payroll batch and submitting payroll).
Again, if you need assistance on payroll basics in AllPay, you can refer to our Overview: Payroll Processing and Manual Entry.
And that’s it for how to process payroll by importing from QSRSoft. As always, you can reach out to us if you have any questions. You can reach out to us by phone at 281-875-1818, or you can reach out directly to your Customer Service Representative, who is listed on your AllPay dashboard. We’re here to guide you through anything you need to use imports as a way to save you some time and effort with payroll processing.